Showing posts with label syncfusion. Show all posts

Tuesday, October 17, 2017

Mobile App On-boarding with Xamarin Forms and Syncfusion

In my previous post, I talked about how awesome xamarin is for creating cross-platform mobile apps. I’ve been thinking a lot about customer on-boarding recently, so I thought I’d do another proof of concept app to illustrate it using xamarin.
As before, I prefer using real companies to illustrate the point. I’m a big fan of Highrise, and how they build product, so I thought they’d make a good candidate this time around, especially since they’re pretty transparent about their processes and value proposition, so it was pretty easy to generate content.
Here’s a quick walk-through the result:


So I’m not going to go into too much technical details here — if you want to check out the source code, check out the github repo. Instead I’m going to break down the app page by page:

The Splash Page

There’s nothing great about the android splash screen, except to note that it’s a 9-patch image, which scales and stretches no matter what orientation or screen size the device is.

The Welcome Page

This page is really the main point of doing the proof of concept. It’s the first thing potentially new customers will see, so it really needs to sell your value proposition. Highrise recently went through a jobs-to-be-done exercise with their customers, and came out with three main points, which you’ll now find on their homepage. So it makes sense to have this on the landing page, along with sign up / sign in options. (Here’s another example of this pattern from Charlin Agramonte). As in Charlin’s example, and this one, it’s a good idea to have some sort of movable media to draw the user’s attention. In this case I’m using the wonderfully cross-platform Lottie Animation Xamarin Bindings from Martijn van Dijk.


Points of interest on this page:
  • Xamarin Forms animation is used to sequentially animate the buttons and ‘more about highrise’ controls
  • the layout and logo image sizing is adaptive to the orientation of the device.
  • The Syncfusion Rotator control is used to automatically cycle through the value proposition animations
  • A ‘learn more’ link in case the user needs some more information before submitting credentials — such as pricing etc.

The Sign In / Sign Up Page

These pages are pretty basic. Keep it simple. Animations purposefully left out of this page as they would detract from the important info, which is the data entry.
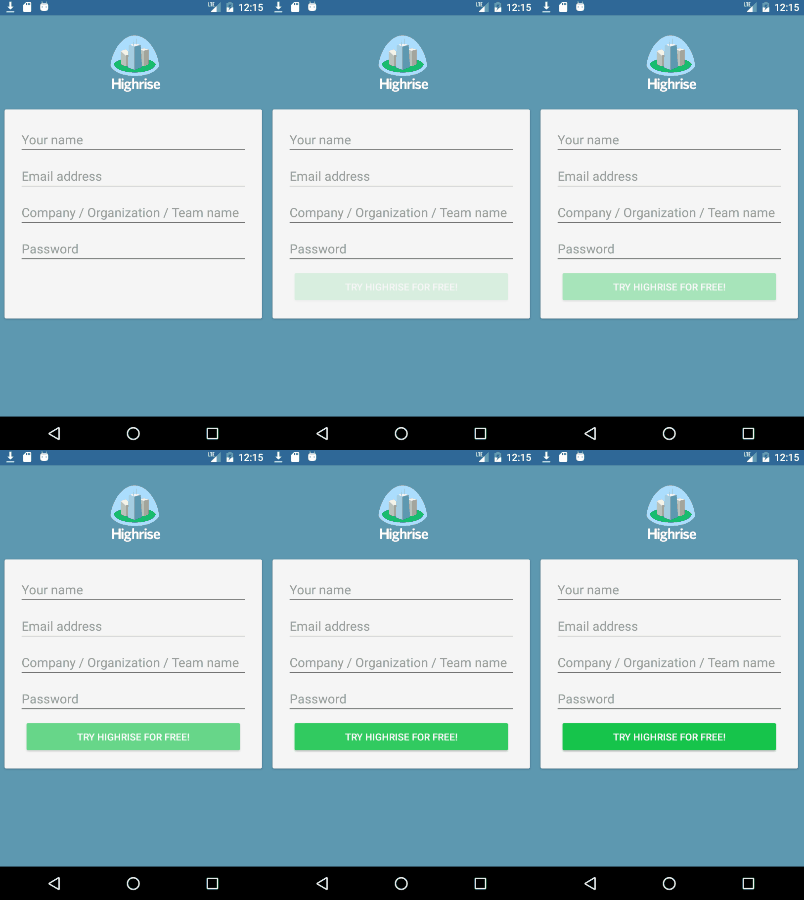
Points of interest:
  • Making use of the floating label design pattern for data entry. This increases the available real estate when working with entry controls
  • The button animates in to draw attention to the text. Don’t worry — it doesn’t flash, that’s just the gif animation recycling :P
  • The logo becomes invisible when the device is in landscape mode to ensure enough real estate for the entry fields

The Landing Page

Okay, so the user made it through the signup process, but still has no idea (or at least very little) what the app can do. The idea conveyed here is to guide the user with visual queues, and get them to do the simplest action that is the main value proposition of the app. In this case it’s creating a contact.


One other thing I wanted to play around with was gamification. So once you’ve created that first contact, the app gives an immediate reward of unlocking your first achievement, along with links to other help topics and features the user may find useful.
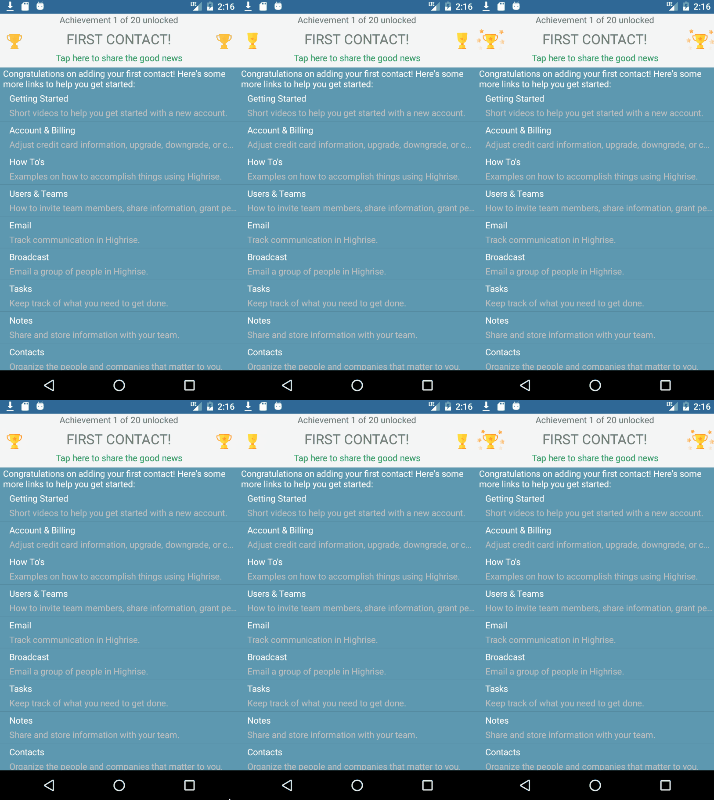
The other thing to be aware of, is giving your users opportunities to share their app experience via social messaging. The Landing Page has a generic ‘I think Highrise is awesome’ share button in the toolbar, and each user achievement has a ‘I just achieved X with Highrise’ share link.

Some more links for related reading

Syncfusion Controls
I used the Rotator and ListView (with left and right swipe actions) controls for this project. I also added an animating radial menu control to the contact page, but it’s not working atm.
Have any thoughts on mobile app on-boarding? Feedback and share them in the comments.


Wednesday, October 11, 2017

Health Care Provider Booking Platform: Proof of Concept Cross Platform App using Xamarin and Syncfusion

So about a month ago, fueled by a conversation with a startup CEO, I decided to write a small app as a proof of concept for building an app that is cross platform, in a short period of time.

You can find the original Medium post here

Good stuff first: Demo Video Time :) 


You can find the source code on GitHub 

In there you'll find code for:

  • Using the geolocator plugin to find the current gps location. code
  • Launch the native device map with a location for directions. code
  • Store data in a sqlite repository. code
  • Schedule Picker control from syncfusion. code
  • Image Circle plugin. code
  • Some fade in animations on the login page. code
  • Syncfusion ListView control with swipe action templates. code
  • Share plugin to share content via registered apps like email and twitter. code
... and a bit more generic stuff like MVVM & Command pattern implementations ; navigation service ; dependency injection using Autofac etc.

Xamarin Forms really is a super productive, fully native and completely extensible option for cross platform mobile development :)


Tuesday, July 11, 2017

Mobile Cross Platform Image manipulation with Xamarin (Android / iOS / Windows UWP)

There are some common image functions I tend to need a lot with mobile apps.
These are:
  1. Resizing images – usually with a specific size in mind
  2. Knowing what size and existing image is
  3. Converting an image between png and jpeg formats
I recently particularly needed these kinds of functions for including images in pdf documents (more on cross platform pdf generation here)
All the source code for the above can be found here, and the nuget package is available here.
All the code assumes images are in byte[] format – what you’d normally use for storing images in database repos etc.
As an aside – there’s a separate Xamarin Forms Value Converter nuget for binding a byte[] image to an ImageSource here
For all the code, you can choose to use the command interface, or the ImageTools interface, which wraps the functionality in explicit method calls.
     image

Resizing an Image

This is the most common requirement for image manipulation.
Images taken from disc, or using the camera are usually way to big to be included for wire transfers or light weight repo stores. Other usages are perhaps generating a pre-defined size thumbnail image.
IResizeImageCommand resizeCommand = DependencyService.Get<IResizeImageCommand>();  
ResizeImageContext context = new ResizeImageContext  { Height = 130, Width = 130, OriginalImage = image  };  
var resizeResult = await resizeCommand.ExecuteAsync(context);  
if (resizeResult.IsValid())  
{  
   image = resizeResult.ResizedImage;  
}  

Analyze an Image

Sometimes you just want to know what the dimensions of an image is, or what size it is, or in what orientation:
 var analyseImage = DependencyService.Get<IAnalyseImageCommand>();
var analyseResult = await analyseImage.ExecuteAsync(new AnalyseImageContext { Image = imageAsBytes });
if (analyseResult.IsValid())
{
   var imageWidth = analyseResult.Width.ToString();
   var imageHeight = analyseResult.Height.ToString();
   var orientation = analyseResult.Orientaion.ToString();
   var size = analyseResult.SizeInKB.ToString();
}

Convert an Image (Png and Jpeg support only)

I needed this recently because the pdf library I was using only supported jpeg files.
var imageTools = DependencyService.Get<IImageTools>();

var convertResult = await imageTools.ConvertImageAsync(new ConvertImageContext(Logo, ImageFormat.Jpeg));
if (convertResult.TaskResult == TaskResult.Success)
{
   ConvertedLogo = convertResult.ConvertedImage;
   ConvertedSize = ConvertedLogo.SizeInKB().ToString();
}
Here I’m using the ImageTools dependency – you could just as easily have used the command as in the first two examples.
…. I haven’t tested all the platforms extensively, so if you find a bug, feel free to log an issue on github, or better yet: a pull request with the fix.

Thursday, July 6, 2017

Generate pdf documents for iOS, Android & Windows UWP using Xamarin Forms and Syncfusion Essentials–Part 2

Part 1 of the post can be found here
There I talk about getting started, and generating a simple pdf invoice.

The updated source code is in the same repository here
Code of interest is in the GenerateInvoiceCommand, the PdfGenerator & PdfExtensions

Today, I’m going to be talking about generating line items for the invoice. Here’s a screenshot of the generated result on all three platforms:
image
    
With Syncfusion Essentials Pdf, there are two main options for this: PdfLightTable & PdfGrid

After having implemented both, I don’t really see why both exist – the effort and functionality is about the same for both options.
I can say though, that PdfGrid definitely seems the more stable of the two – I found a few bugs in PdfLightTable along the way.

A look at the result: PdfLightTable on the left, and PdfGrid on the right

imageimage

Some things to consider (included in the sample code above)

More documentation on pdf grid and light table can be found here

Adding data

Both types used direct data-source methodologies.

Grid:
image

LightTable:
image

Sizing columns to content

Unfortunately this isn’t as simple as it should be. Static widths are easy – content not so much.
I created extensions for both LightTable and PdfGrid here (currently LightTable doesn’t appear to work)
Currently we have to cycle through all the column data, and measure which is the longest text, and then set the width to the max content width, hence the need for data, page width and font used.

image

Styling the table

PdfGrid has some built-in styles, as well as customization
image

LightTable you can customize the same as with PdfGrid – I created an extension to apply the most common properties to mimic the built-in style of the PdfGrid
image

Paginating the data

This applies to both table types, although again, LightTable seems to have some trouble honoring the PageinateBounds property – which is needed to the table doesn’t render over any footer data.
image

Drawing the pdf document

image

simple enough.

There’s tons more functionality in syncfusion’s pdf library – go check it out.

Clone the repo and play around with the code - and log an issue if you find any bugs in there :)

And don’t forget syncfusion’s awesome community license that  offers their controls free for indie hackers and small businesses.

Wednesday, December 7, 2016

Xamarin Forms: Customizing the Synfusion Kanban Control is as simple as 1-2-3

Following on from my previous post on getting started with the Kanban Control from Syncfusion, we’re going to have a look at customizing the kanban card template, binding the tap event on the card to execute a command and binding the card to a custom model.

As always, you can find all the source code here

image       image  image

Disclaimer: As of this writing, there are rendering issues with the Windows UWP implementation. A support ticket has be lodged with Syncfusion and it should be resolved with the next iterative release.

1) Providing a Custom Model

In the previous post, we used a KanbanModel to bind against. But you’re free to bind against any object, so long as the properties fire a NotifyPropertyChange event (class must implement the INotifyPropertyChange interface).

In the custom example, I’m using the CustomModel class, which inherits from the BindableBase class that comes out the box with the Prism.Core nuget package.

Properties look something like:

image

Remember that the columns in the Kanban control map by default to a ‘Category’ property. If you want the columns to map to a different property on the model, then set the ColumnMappingPath property on the SfKanban control

image

2) Customizing the Kanban Card

If you’re accustomed to any XAML technology, then customizing the kanban card should be familiar. The idea is that you supply a custom user control to act as a template when rendering the items for the bound collection. For a sample of a custom user control, check out the CustomCard.xaml user control in the source code. The only significant thing to note is the root element is a ContentView.

Once you have a template defined, then the only thing left to do, is to add it as the DataTemplate to the SfKanban control:

image

3) Binding the Tap Event to a Command on the ViewModel

It’s a common scenario that you want to perform a certain action when the user taps in a card. Currently there is no TapItemCommand property on the SfKanban control, but you can achieve the same thing by implementing a behavior.

The KanbanItemTappedToCommandBehavior can be found here.

Basically it takes the ItemTapped event from the card, and executes the command when the event fires.

You then bind the behavior to the SfKanban control like so:

image

The command on the ViewModel would look something like:

image

… and that’s it.

Happy Coding.

Thursday, December 1, 2016

Xamarin Forms and the Syncfusion Kanban Control: Getting Started


kanban

Xamarin Forms and Syncfusion Xamarin Controls are a great combination to get great looking cross platform native mobile apps while using a mostly shared code base.

In this blog post we’re going to look at getting started with one of the newer controls to the syncfusion xamarin family: The Kanban Control

First and foremost, all the source code for the examples below can be found here

If you’re not familiar with getting a Xamarin Forms app up and running – have a look at the quick start outlines here

Nuget packages for syncfusion controls can be found here – keep in mind you need a license to be able to use them. Luckily if you’re a hobbyist developer or a company with less than five people, you can get a community license which is FREE!

Okay – time to get started.
I’m going to assume you already set up a Xamarin Forms wireframe app – check out the quick start above for details on how to get that up and running.
Usually a new Xamarin Forms project adds Windows Phone variant projects. I tend to stick with UWP only for windows, since this is generally more actively supported by control suites.

To get access to the syncfusion nugets, setup a new nuget package source that points to the syncfusion nuget location.
Add nuget packages for the syncfusion kanban control:

image

be sure to set the source to the syncfusion xamarin nuget location:

image

Every project needs to have a reference to the Syncfusion.Xamarin.SfKanban nuget package. You’ll notice there are Android and iOS variants for the package too – these are for the specific Xamarin native platforms (would have been helpful if they actually postfixed the package with “.Forms” – can get a bit confusing as to which package to pick)

Now for some code:

In the portable library, create a ViewModel class to contain all the items that the cards on the kanban control are going to bind to. A sample of the ViewModel class can be found here
The important bits:

You need a class that is the model that each kanban card will represent. Syncfusion provides a default called KanbanModel. We’ll use this for now, but you can use your own model classes too (which I’ll cover in another post). Place an ObservableCollection of this model as a property on the ViewModel class:

image

…. and then add some items to the collection:

image

Take note of the Category property, as this is going to be used by the control to know in which swim lane to place the kanban card.

Next, create a page that will host the kanban control – sample can be found here

image

… and then wire up the BindingContext of the Page to your ViewModel:

image

.. and then attach categories to each column, so the kanban control knows where to place each item template:

image

This is done in code behind, but you could just as easily bind these to ViewModel properties in XAML.

Be sure to set the Page to the startup page in the Forms App class:

image

… and that should be it. Download the source code and give it a test drive.

In my next post I’ll cover:

  • Bind cards to custom models
  • Creating a custom card template
  • Opening up another page when a card gets tapped using a command.

Happy Coding.

Sunday, November 13, 2016

Generate pdf documents using Xamarin Forms and Syncfusion in 5 easy steps

Xamarin Forms is a great way to implement cross platform fully native mobile apps, but when developing these apps, there’s still a gap ito components needed to fill out the functionality.
These gaps typically fall into two areas:  Platform Services (Camera / GPS / Maps / Settings etc.) and UI Components.
The Xamarin Plugins are a great resource for the former. There are a few resources for the latter, but I have found the Syncfusion Xamarin Control Suite to be the most helpful.
image
One of the more common needs, of Line of Business apps particularly, is for pdf integration (generating / reading / merging etc.)
The syncfusion xamarin samples seem to be a little sparse, so I thought I’d share an example implementation here.
For more in-depth syncfusion pdf documentation, have a look here. There’s quite a bit more pdf capability that they provide than what is covered here.
This post will cover a basic scenario of generating a pdf document from invoice information using the syncfusion pdf component for Xamarin.
Source code for this post can be found here.
If you’re looking for the detail, check out the github repo – we’ll cover the basic outlines here of what’s necessary.

1. Create context for the pdf generation

In the case of the sample code, I’ve created a GenerateInvoiceContext class – which mostly houses the Invoice from which to generate the pdf from.
All the information that you require to generate the pdf needs to be contained in this class.

2. Wrap the generation logic into a command

Create an implementation class that contains the logic for generating the pdf from the invoice. In the sample code, this is the GenerateInvoiceCommand class. I’ve used the command pattern here, because it’s a great way to separate out and force the single responsibility design pattern. The basics for command implementation are provided by the Command Pattern Wireframe nuget package, which provides and ExcuteAsync<TIn, TOut> command pattern to follow. So calling the command from the view model looks something like this:
image
Note that you don’t need to wrap the logic in a command – this is just my personal preference for keeping the code clean.

3. Creating a pdf document

When generating pdf elements, you need to first create the document, and a page for the document before you can start adding elements. I’ve created a PdfGenerator class to make these tasks a little easier. In the Setup method you’ll notice the creation of the document and the first page, as well as common properties for the document to be generated:
image

4. Add elements to the pdf document

Generally, you need to add elements to the pdf document using a top-down approach, keeping track of the Y-position in order to make sure that each element is placed correctly in reference to the previously added element.
image
I found it useful to prefer the methods on the syncfusion pdf component that return a PdfLayoutResult – this helps in creating a reference for where the bounds of the next generated controls needs to be.

5. Save and launch the pdf document

Until now – all the code is shared between all the mobile platforms (iOS / Android / UWP), but saving and launching the pdf document requires platform specific code. In order to call platform code from the shared code, it’s useful to abstract the platform implementation behind an interface – which is then implemented for each platform. I’ve again used the command pattern for ease of use:
image
Now each platform should provide an implementation, which is resolved using Xamarin Forms DependencyService (or you can wire it up using another container service like Autofac)
An example of the android implementation can be found here.
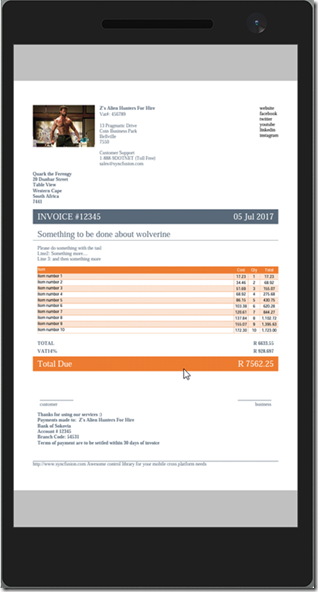
… and a screen grab of the finished product:
image

Bonus

The xamarin syncfusion components are pretty handy, and in my experience the support I’ve received from them has been exceptional.
The best part though, is that all of it is available for FREE – if you’re a single developer or a small business. Check out the community license here.
As someone who has a side project that he hopes to turn into a business one day – it’s these kinds of licensing models which are really helpful – thanks syncfusion!