Xamarin Forms is a great way to implement cross platform fully native mobile apps, but when developing these apps, there’s still a gap ito components needed to fill out the functionality.
These gaps typically fall into two areas: Platform Services (Camera / GPS / Maps / Settings etc.) and UI Components.
The
Xamarin Plugins are a great resource for the former. There are a few resources for the latter, but I have found the
Syncfusion Xamarin Control Suite to be the most helpful.

One of the more common needs, of Line of Business apps particularly, is for pdf integration (generating / reading / merging etc.)
The
syncfusion xamarin samples seem to be a little sparse, so I thought I’d share an example implementation here.
For more in-depth syncfusion pdf documentation, have a look
here. There’s quite a bit more pdf capability that they provide than what is covered here.
This post will cover a basic scenario of generating a pdf document from invoice information using the
syncfusion pdf component for Xamarin.
Source code for this post can be found
here.
If you’re looking for the detail, check out the github repo – we’ll cover the basic outlines here of what’s necessary.
1. Create context for the pdf generation
In the case of the sample code, I’ve created a GenerateInvoiceContext class – which mostly houses the
Invoice from which to generate the pdf from.
All the information that you require to generate the pdf needs to be contained in this class.
2. Wrap the generation logic into a command
Create an implementation class that contains the logic for generating the pdf from the invoice. In the sample code, this is the
GenerateInvoiceCommand class. I’ve used the command pattern here, because it’s a great way to separate out and force the single responsibility design pattern. The basics for command implementation are provided by the
Command Pattern Wireframe nuget package, which provides and ExcuteAsync<TIn, TOut> command pattern to follow. So calling the command from the view model looks something like this:

Note that you don’t
need to wrap the logic in a command – this is just my personal preference for keeping the code clean.
3. Creating a pdf document
When generating pdf elements, you need to first create the document, and a page for the document before you can start adding elements. I’ve created a
PdfGenerator class to make these tasks a little easier. In the Setup method you’ll notice the creation of the document and the first page, as well as common properties for the document to be generated:

4. Add elements to the pdf document
Generally, you need to add elements to the pdf document using a top-down approach, keeping track of the Y-position in order to make sure that each element is placed correctly in reference to the previously added element.
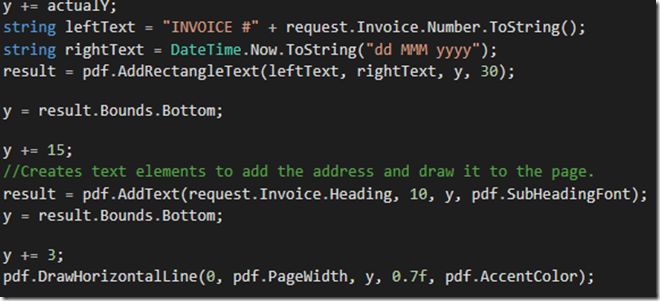
I found it useful to prefer the methods on the syncfusion pdf component that return a PdfLayoutResult – this helps in creating a reference for where the bounds of the next generated controls needs to be.
5. Save and launch the pdf document
Until now – all the code is shared between all the mobile platforms (iOS / Android / UWP), but saving and launching the pdf document requires platform specific code. In order to call platform code from the shared code, it’s useful to abstract the platform implementation behind
an interface – which is then implemented for each platform. I’ve again used the command pattern for ease of use:

Now each platform should provide an implementation, which is resolved using Xamarin Forms
DependencyService (or you can wire it up using another container service like
Autofac)
An example of the android implementation can be found
here.
… and a screen grab of the finished product:

Bonus
The xamarin syncfusion components are pretty handy, and in my experience the support I’ve received from them has been exceptional.
The best part though, is that all of it is available for FREE – if you’re a single developer or a small business. Check out the
community license here.
As someone who has a side project that he hopes to turn into a business one day – it’s these kinds of licensing models which are really helpful – thanks syncfusion!


